Hadoop 3.3.0 Multi-Node Cluster on Ubuntu.
1. Introduction.
We live in modern era which is the age of big data, where the data volumes are need to work with on a day-to-day basis have outgrown the storage and processing capabilities of a single host. Big data brings with it two fundamental challenges: how to store and work with voluminous data sizes, and more important, how to understand data and turn it into a competitive advantage.
Hadoop fills a gap in the markets by effectively storing and providing computational capabilities for substantial amounts of data. It’s a distributed system made up of a distributed file system and it offers a way to parallelize and execute programs on a cluster of machines. Hadoop is adopted by technology giants over the world and to address their big data needs and it’s making inroads across all industrial sectors.
Here, we will describe how to install Apache Hadoop 3.3.0 Multi-Node Cluster on Ubuntu. and for this article, we will use a name node and two data nodes.
• Hadoop Name node: hnnode
• Hadoop data node: hdnode1
• Hadoop data node: hdnode2
Environments :
• Microsoft Windows 10
• Oracle VirtualBox 6.0
Requirement:
Ubuntu 22.04 installed on a virtual machine.
2. Virtual Box Network Configuration
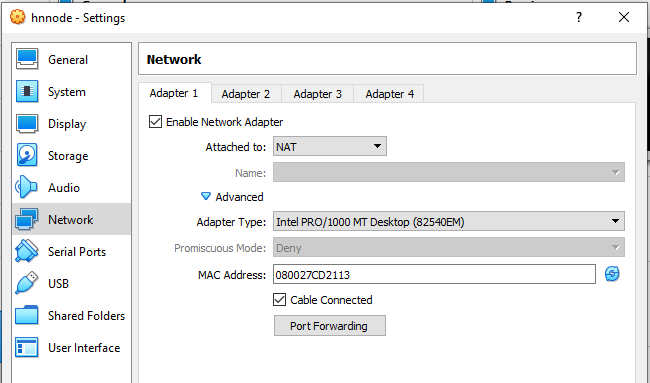
2.1 Adapter 1.
Select Network and our network setting of Adapter1 is shown in picture. It is default setting.
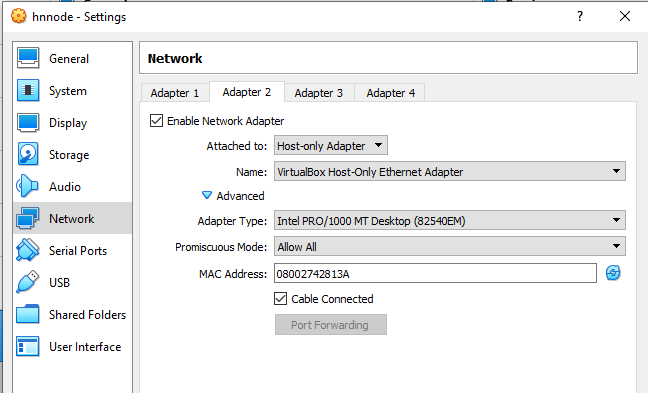
2.2. Adapter 2.
Click Adapter 2 and ensure Check Enable Network Adapter, select Host-Only Adapter from Attached
to dropdown list box and select Allow All from Promiscuous Mode dropdown list box. It is shown in
the picture bellow.
• Check the network configuration.
Start our VM and login.
3. Update Ubuntu 22.04 LST.
First of all, we update Ubuntu 22.04 LST. Nano text editor is very nice but I feel comfortable with vim text editor for this it is installed with update Ubuntu. You can use nano text editor, for this you do not need to install but it is already in Ubuntu. Press CTRL + ALT+ T to launch terminal (or click right mouse button on Ubuntu Desktop and click open terminal).
        $ sudo apt update
        $ sudo apt upgrade
        $ sudo apt install net-tools
        $ sudo apt install vim
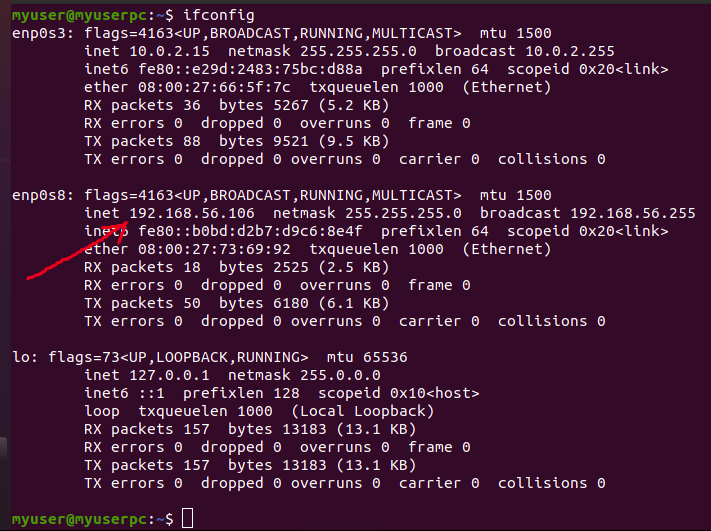
Execute the following command into ubuntu terminal.
$ ifconfig
And output is shown in the following picture and reddish arrow sign indicates IP address.
4. Java 8 Installation.
4.1 Download 64bit java 8 for Linux in tar.gz format jdk into your Desktop and move it to any folder say /usr/local/java and use “chmod 777” for access permissions. When you execute the following commands, it may ask to your password and you give it as usual. Executions of these commands in ubuntu terminal are shown in the picture.
        $ sudo mkdir /usr/local/java
        $ sudo chmod 777 /usr/local/java
        $ sudo mv ~/Desktop/jdk-8u251-linux-x64.tar.gz /usr/local/java

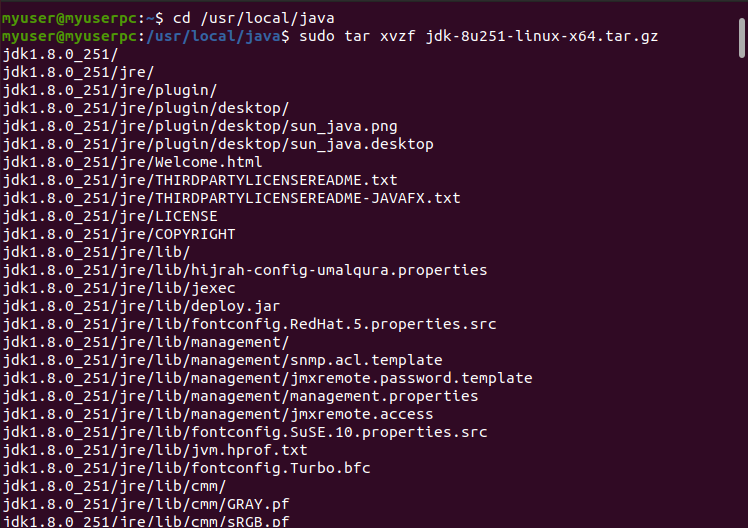
4.2 Untar it using the below command
        $ cd /usr/local/java
        $ sudo tar xvzf jdk-8u251-linux-x64.tar.gz
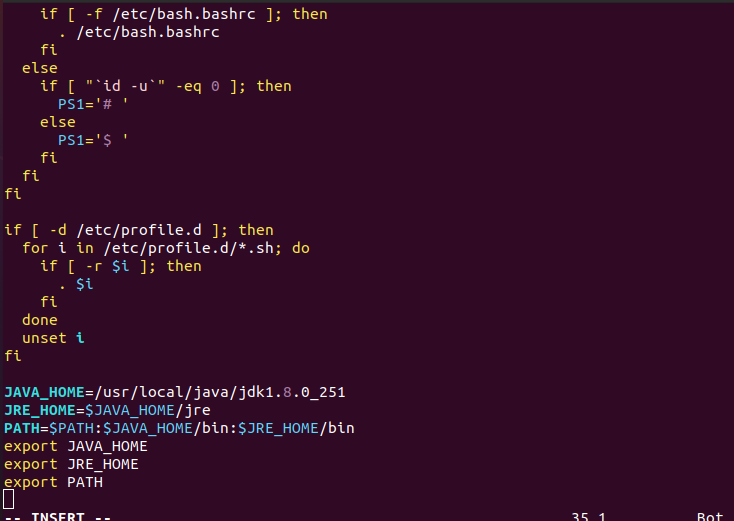
4.3 Edit the system PATH file /etc/profile and add the following system variables
[vim operation: go to bottom last and press i for editing mode. After editing complete press esc key to remove insert or edit mode. For save and exit go to last and write :wq and press enter].
$ sudo vim /etc/profile

        JAVA_HOME=/usr/local/java/jdk1.8.0_251
        JRE_HOME=$JAVA_HOME/jre
        PATH=$PATH:$JAVA_HOME/bin:$JRE_HOME/bin
        export JAVA_HOME
        export JRE_HOME
        export PATH
4.4. Inform your Ubuntu Linux system where your Oracle Java JDK/JRE is located.
        sudo update-alternatives --install /usr/bin/java java /usr/local/java/jdk1.8.0_251/jre/bin/java 1
        sudo update-alternatives --install /usr/bin/javac javac /usr/local/java/jdk1.8.0_251/bin/javac 1

4.5 Inform your Ubuntu Linux system that Oracle Jave JDK/JRE must be the default java.
        sudo update-alternatives --set java /usr/local/java/jdk1.8.0_251/jre/bin/java
        sudo update-alternatives --set javac /usr/local/java/jdk1.8.0_251/bin/javac

4.6. Reload your system side PATH/etc/profile by typing the following command
$ . /etc/profile

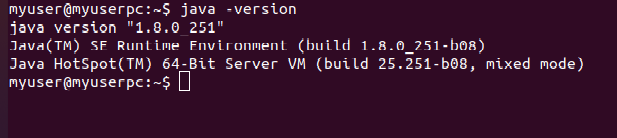
4.7. Test to see if Oracle Java was Installed correctly on your system. Run the following commands and note the version of Java
$ java –version
5. Adding a dedicated user and group.
We use a dedicated user and group because it helps to separate the hadoop installation from other software applications and user accounts running on the same machine(security, permissions, backup. etc.)
5.1. Login as root user.
        $ sudo su
        # whoami --should give root
5. 2. Create a Group called hadoop
# sudo addgroup hadoop
5.3. Create a User hduser
# sudo adduser hduser
It will ask you to enter password 2 times followed by some details, give password “hadoop” just press enter and yes. We have given password hadoop.
5.4. Add hduser to hadoop group
# sudo adduser hduser hadoop
5.5. Exit from root user and add the 'hduser' to sudoers list so that hduser can do admin tasks.
$ sudo visudo
5.5 Add a line under ##Allow member of group sudo to execute any command anywhere in the format. (copy and paste the following line. )
hduser ALL=(ALL) ALL

press ctrl+x, Y, enter enter
5.6. Logout Your System and login again as hduser
6. Configuration of SSH and PDSH.
Hadoop uses SSH(Secure Shell) to remotely launch processes such as the DataNode and TaskTracker, even when everything is running on a single node in pseudo distributed mode. PDSH is a high performance and parallel remote shell utility. It can run multiple remote commands in parallel.
6.1 Installation of SSH.
Execute the following line of code into the ubuntu terminal.
$ sudo apt install ssh.
It asks you for password. When it asks password, enter password (hadoop) and Y to continue.
6.2 Installation of pdsh
Execute the following line of code into the ubuntu terminal.
$ sudo apt install pdsh
Just like before, enter password and give confirmation when needed.
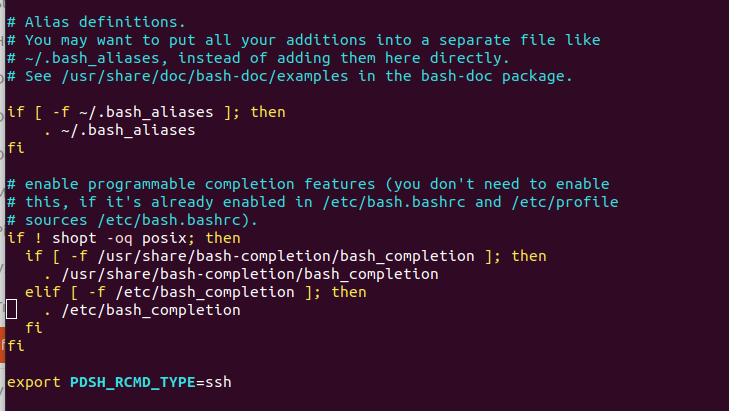
6.3. Now open the .bashrc file with the following command:
[vim operation: go to bottom last and press i for editing mode, after editing complete press esc key to remove mode. For save and exit go to last and write :wq and press enter].
$ sudo vim ~/.bashrc

At the end of the file just write the following line:
export PDSH_RCMD_TYPE=ssh
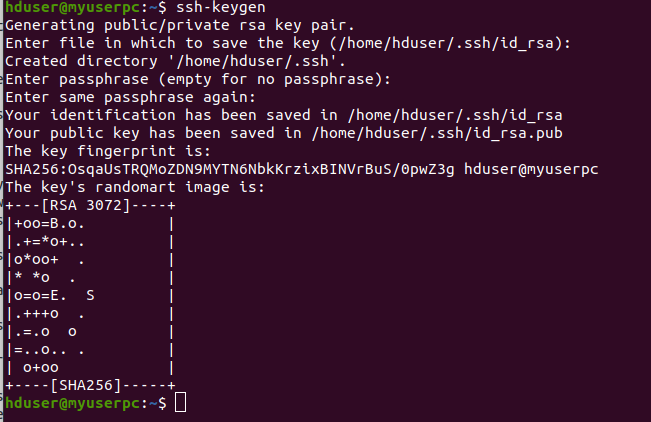
6.4 Generate SSH for communication
$ ssh-keygen
Just press enter for whatever is asked.
6.5 Copy Public Key to Authorized key file & edit the permission. So that ssh should not require passwords every time.
$ cat ~/.ssh/id_rsa.pub >> ~/.ssh/authorized_keys
6.6 Change permission of the authorized keys file, to have all permissions for hduser
$ chmod 700 ~/.ssh/authorized_keys

6.7. Test Your SSH Connectivity
$ ssh localhost
Type 'Yes', when asked for. You should be able to connect without password. If you are asked to enter password here, then something went wrong. Please check your steps.

7. Hadoop Installation
7.1. Download Apache Hadoop 3.3.0 Version from the official website. You can also download it from Ubuntu terminal with the following commands
$ wget https://archive.apache.org/dist/hadoop/common/stable/hadoop-3.3.0.tar.gz
And save the file into hduser/Desktop.
7.2. Short Descriptions of the commands:
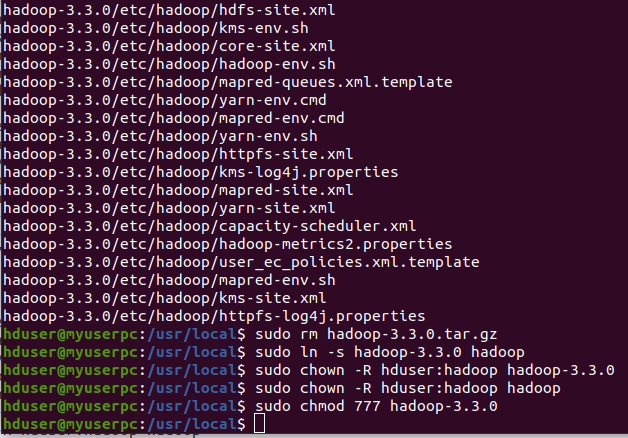
For moving the zip file to /usr/local/, go to /usr/local/, to unzip the file, to remove the tar file, to give short name of hadoop-3.3.0 (hadoop) and for permissions, please execute the following commands one by one in Ubuntu terminal.
        $ sudo mv ~/Desktop/hadoop-3.3.0.tar.gz /usr/local/
        $ cd /usr/local
        $ sudo tar -xvf hadoop-3.3.0.tar.gz
        $ sudo rm hadoop-3.3.0.tar.gz
        $ sudo ln -s hadoop-3.3.0 hadoop
        $ sudo chown -R hduser:hadoop hadoop-3.3.0
        $ sudo chown -R hduser:hadoop hadoop
        $ sudo chmod 777 hadoop-3.3.0
It is not possible to show all commands executions in one screenshot. So two screenshots are used.

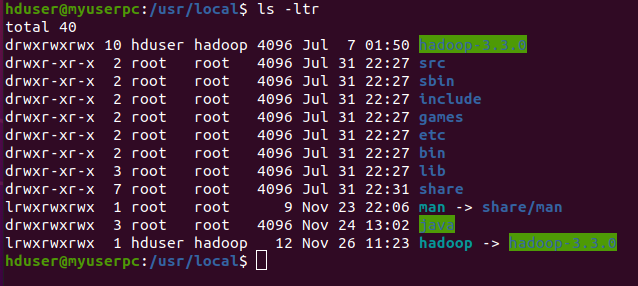
For show you can execute the following command
$ ls –ltr
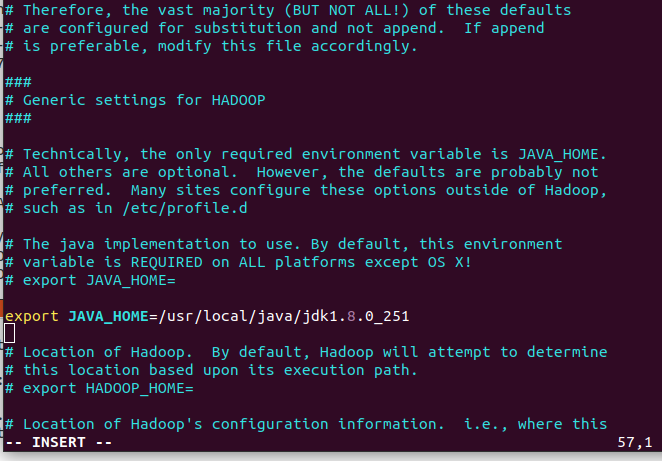
7.3. Edit hadoop-env.sh and configure Java.
Add the following line export JAVA_HOME=/usr/local/java/jdk1.8.0_251 to /usr/local/hadoop/etc/hadoop/hadoop-env.sh by removing
export JAVA_HOME=${JAVA_HOME}
[Vim Operation: See 4.3 or 6.3]
$ sudo vim /usr/local/hadoop/etc/hadoop/hadoop-env.sh

export JAVA_HOME=/usr/local/java/jdk1.8.0_251
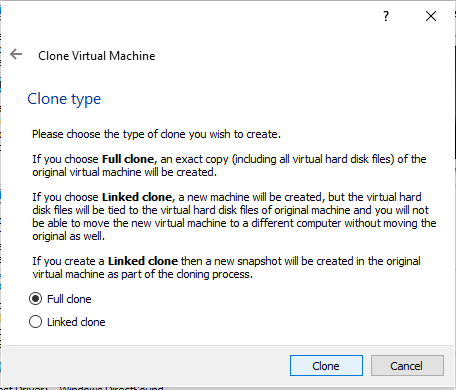
8. Clone for creating another Nodes
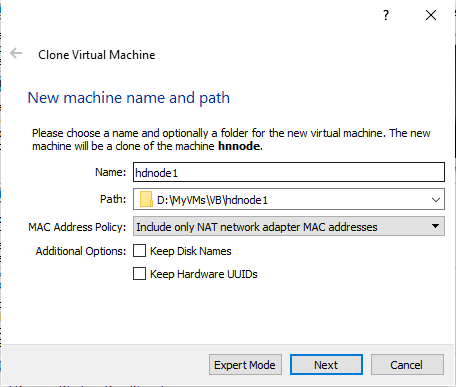
Now we create data node hdnode1 and hdnode2 by cloning hnnode. Shut down your VM.
a. Right click on virtual machine and choose clone. Give a custom name hdnode1 and select appropriate path from the drop down list box. On Clone type screen , choose Full Clone option.
b. Create hdnode2 same as like hdnode1
For this article, brief descriptions of our three machines configurations are given bellow:
1. Name node: hnnode, with 2 vCPUs, 4 GB of memory, 40 GB of hard drive space.
2. Data node: hdnode1, with 2 vCPUs, 8 GB of memory, 40 GB of hard drive space.
3. Data node: hdnode2, with 2 vCPUs, 8 GB of memory, 40 GB of hard drive space.
You can change your configurations according to you resources.
9. Check connectivity of domains and IP addresses.
Now we load hnnode, hdnode1 and hdnode2 in virtualbox and our credentials are hduser/hadoop to login in all the 3 systems. Let us find the IP Addresses of all 3 systems, executing the following command on each terminal.
hduser@myuserpc:~$ ifconfig
hnnode 192.168.56.106
hdnode1 192.168.56.107
hdnode2 192.168.56.108
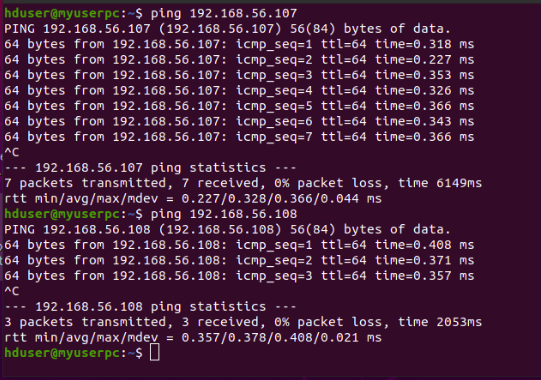
Let us check the reach-ability of nodes as following:
hnnode hduser@myuserpc:~$ ping 192.168.56.107 //hnnode pinging hdnode1
hnnode hduser@myuserpc:~$ ping 192.168.56.108 //hnnode pinging hdnode2
Like this, execute the following commands.
hdnode1 hduser@myuserpc:~$ ping 192.168.56.106 //hdnode1 pinging hnnode
hdnode1 hduser@myuserpc:~$ ping 192.168.56.108 //hdnode1 pinging hdnode2
hdnode2 hduser@myuserpc:~$ ping 192.168.56. 106 //hdnode2 pinging hnnode
hdnode2 hduser@myuserpc:~$ ping 192.168.56. 107 //hdnode2 pinging hdnode1
10. Update the hosts on all 3 nodes.
hnnode VM:
$ sudo vim /etc/hosts

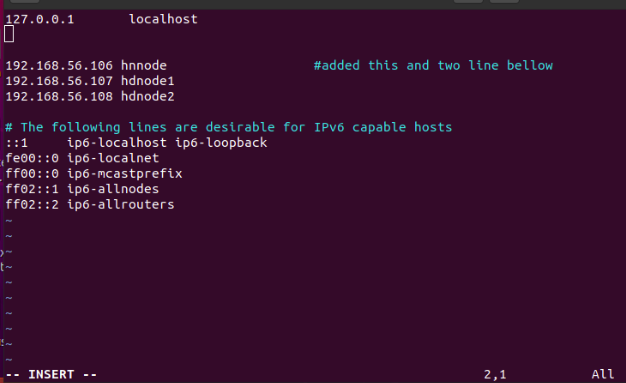
Insert the following lines:
        127.0.0.1 localhost
        #127.0.0.1      hnnode      #remove this line.

        192.168.56.106 hnnode
        192.168.56.107 hdnode1
        192.168.56.108 hdnode2
Repeat the same in hdnode1 and hdnode2.
11. Change the hostname of all 3 systems.
hnnode VM.
$ sudo vim /etc/hostname

Press i on the keyboard and write 'hnnode' by deleting myuserpc as swhown in the figure.
Press ESC on the keyboard
Save the configuration by :wq
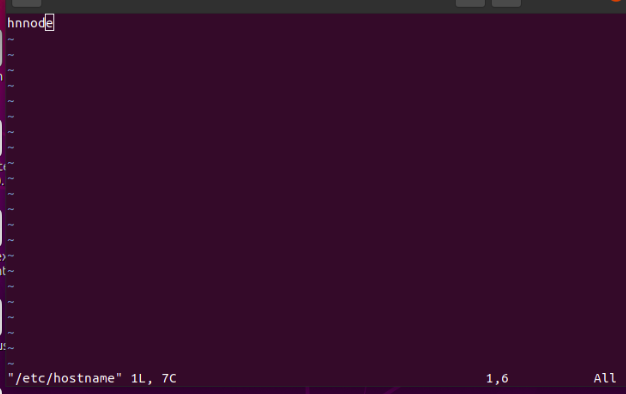
Repeat the above step with hdnode1 and hdnode2 virtual machine and change the host name to hdnode1 and hdnode2.
It should be hnnode, hdnode1, hdnode2 in 3 machines respectively.
Reboot all of the 3 systems, so that the configurations take effects.
In fact when you launch terminal (ctrl + shift + T), instead of showing
hduser@myuserpc:~$
It now shows
        hduser@hnnode:~$                # hnnode [master node]
        hduser@hdnode1:~$               # hdnode1 [slave node 1]
        hduser@hdnode2:~$               # hdnode2 [slave node 2]
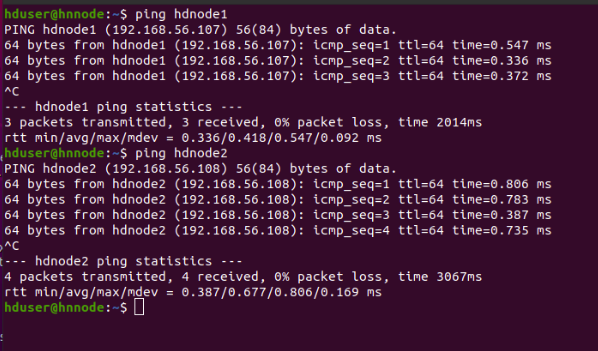
12. Ping Each other using Hostname
Again we check the reach-ability of nodes by hostname. Start pinging each other system again using the hostname instead of ip address
        hduser@hnnode:~$ ping hdnode1
        hduser@hnnode:~$ ping hdnode2
Like this, you can try with the following commands.
            hduser@hdnode1:~$ ping hnnode
            hduser@hdnode1:~$ ping hdnode2

            hduser@hdnode2:~$ ping hnnode
            hduser@hdnode2:~$ ping hdnode1
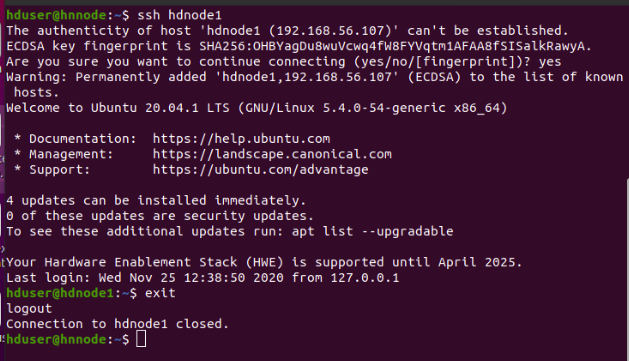
13. Test SSH Connectivity
Let us test the ssh connectivity by doing the following. It will ask for yes or no and you should type 'yes'. Perform ssh hnnode/hdnode1/hdnode2 on each of the node to verify the connectivity.
        hduser@hnnode:~$ ssh hdnode1         #Type Yes. It will connect to hdnode1
        hduser@hdnode1:~$ exit               #will exit hdnode1 and goes back to hnnode
        hduser@hnnode:~$ ssh hdnode2        #Type Yes. It will connect to hdnode2
        hduser@hdnode2:~$ exit              #will exit hdnode2 and goes back to hnnode.
        hduser@hnnode:~$
It will ask for yes or no and you should type 'yes' We should be able to SSH namenode and SSH datanodes without password prompt.If it asks for password while connecting to namenode or datanodes using SSH, there is something went wrong and you need to fix it before proceeding further.
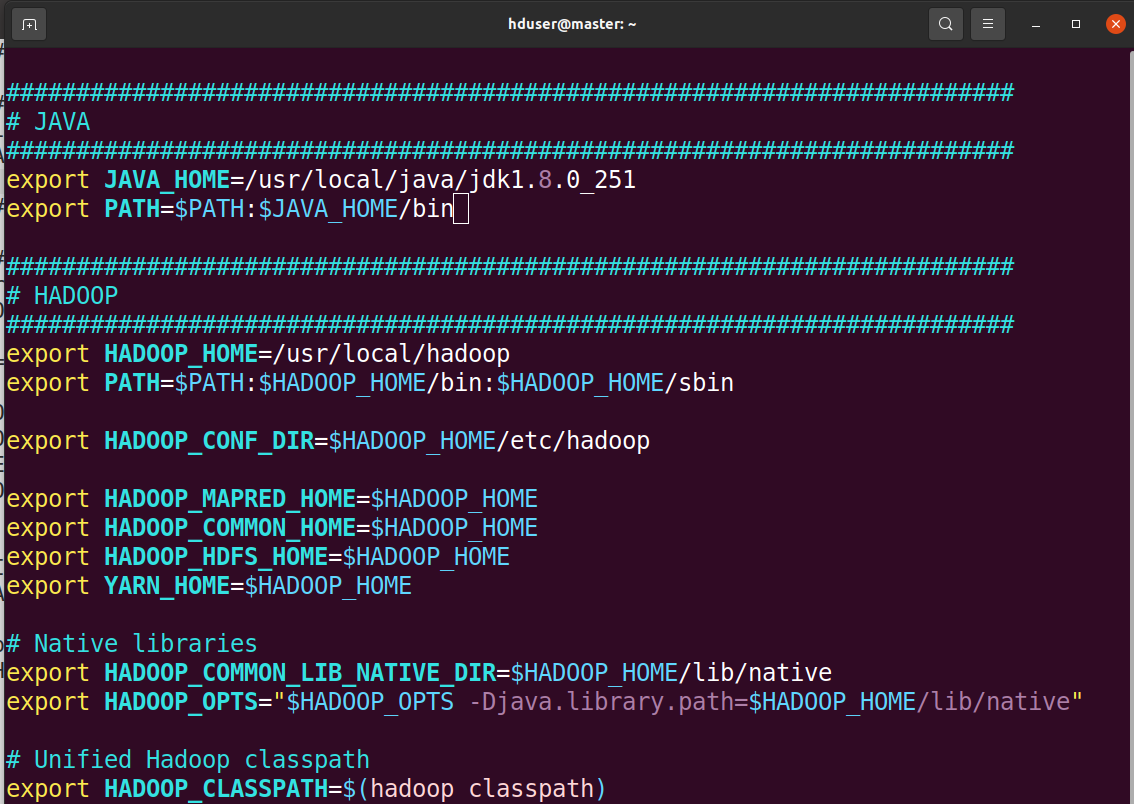
14. Configuring the environment variables.
Hadoop cluster needs to configure the environment in which the Hadoop daemons execute as well as the configuration parameters for the Hadoop daemons. Setup the environment variables, edit ~/.bashrc file.
$ sudo vim ~/.bashrc

Append the following lines at end of file as shown in the figure.
         ########################################################################
        # JAVA
        ########################################################################
        export JAVA_HOME=/usr/local/java/jdk1.8.0_251
        export PATH=$PATH:$JAVA_HOME/bin

        ########################################################################
        # HADOOP
        ########################################################################
        export HADOOP_HOME=/usr/local/hadoop
        export PATH=$PATH:$HADOOP_HOME/bin:$HADOOP_HOME/sbin

        export HADOOP_CONF_DIR=$HADOOP_HOME/etc/hadoop

        export HADOOP_MAPRED_HOME=$HADOOP_HOME
        export HADOOP_COMMON_HOME=$HADOOP_HOME
        export HADOOP_HDFS_HOME=$HADOOP_HOME
        export YARN_HOME=$HADOOP_HOME

        # Native libraries
        export HADOOP_COMMON_LIB_NATIVE_DIR=$HADOOP_HOME/lib/native
        export HADOOP_OPTS="$HADOOP_OPTS -Djava.library.path=$HADOOP_HOME/lib/native"

        # Correct unified Hadoop classpath
        export HADOOP_CLASSPATH=$(hadoop classpath)
Then, apply the changes in the current running environment.
$ source ~/.bashrc
15. Configuring the Hadoop Daemons.
This section deals with important parameters to be specified in the four configurations files:
15.1. Update file core-site.xml for Namenode and all data nodes
$ sudo vim /usr/local/hadoop/etc/hadoop/core-site.xml

[vim operation: [See 4.3] press i for editing mode. After editing complete press esc key to remove insert or edit mode. For save and exit go to last and write :wq enter]. Update the file with the following code as shown in the figure.
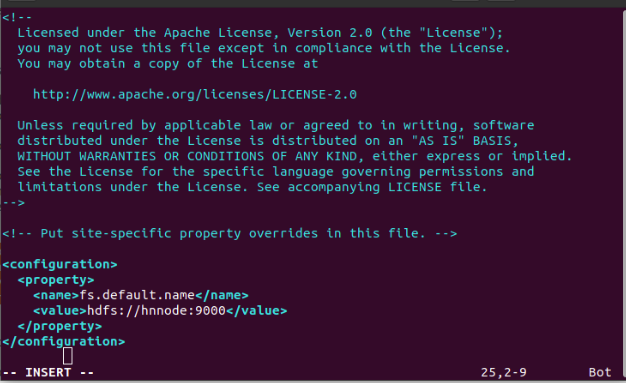
Repeat the same for hdnode1 and hdnode2.
15.2. Configurations for Namenode and all Datanodes.
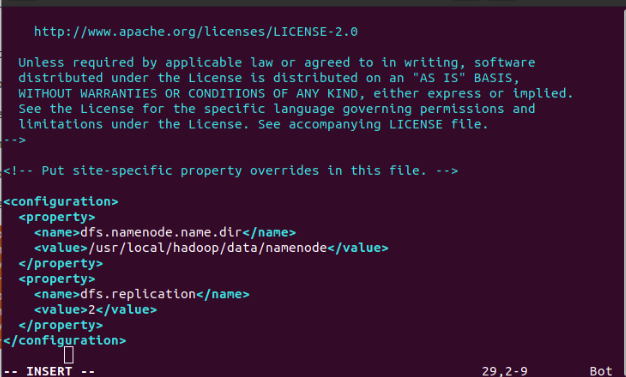
Update hdfs-site.xml file for Namenode and all Datanodes
For hnnode:
$ sudo vim /usr/local/hadoop/etc/hadoop/hdfs-site.xml

Update the file with the following lines of code as shown in the figure.
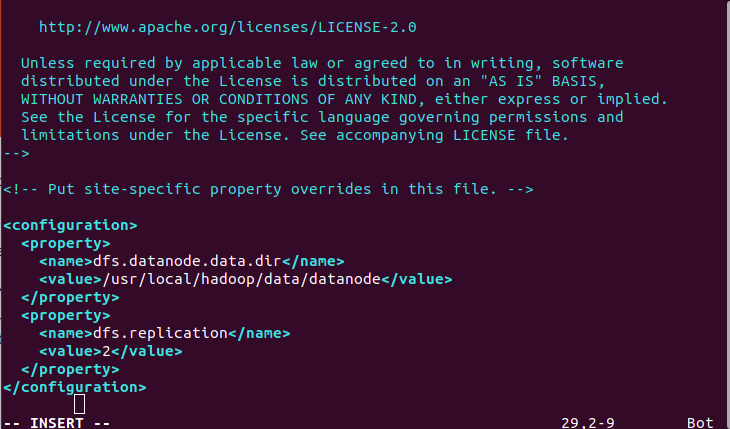
For hdnode1:
$ sudo vim /usr/local/hadoop/etc/hadoop/hdfs-site.xml

Update the file with the following lines as shown in the figure.
For hdnode2:
$ sudo vim /usr/local/hadoop/etc/hadoop/hdfs-site.xml
Repeat the same as like hdnode1.
15.3. Configurations for ResourceManager and NodeManager:
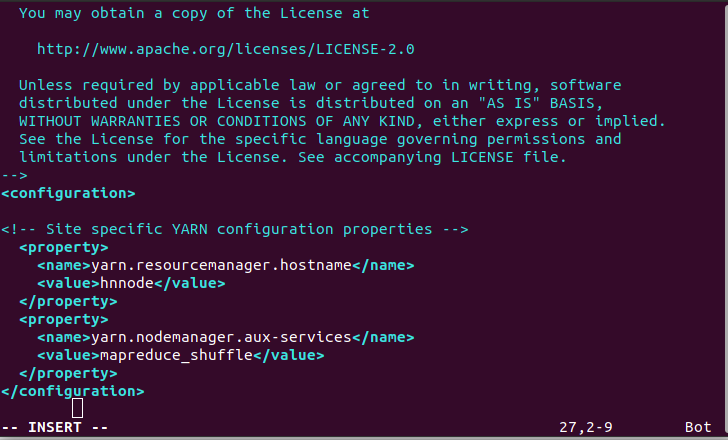
On each of datanodes (hdnode1 and hdnode2) we need to add the lines of code to /usr/local/hadoop/etc/hadoop/yarn-site.xml file as shown in figure.
For hdnode1:
$ sudo vim /usr/local/hadoop/etc/hadoop/yarn-site.xml

Wirte the following lines of code as shown in the figure.
For hdnode2:
Repeat the same as like hdnode1.
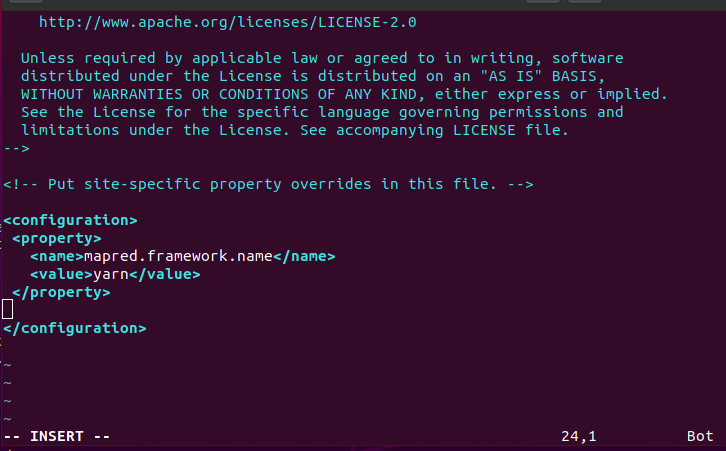
15.4. Configurations for MapReduce Applications:
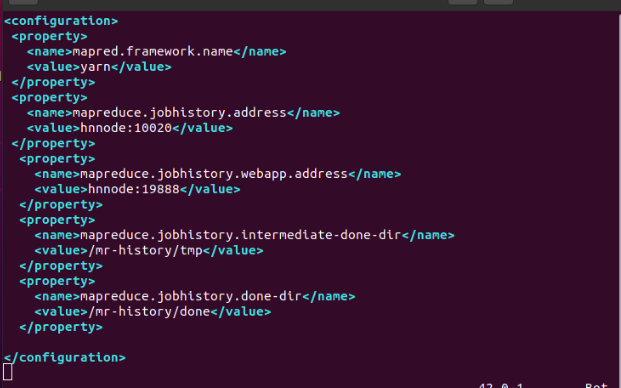
We update mapred-site.xml file for NameNode.
For hnnode:
$ sudo vim /usr/local/hadoop/etc/hadoop/mapred-site.xml

We add these following lines of code in the file as shown in the figure
We update mapred-site.xml file for all datanodes.
For hdnode1:
$ sudo vim /usr/local/hadoop/etc/hadoop/mapred-site.xml

Add the following lines of code in the mapred-site.xml file as shown in the figure.
And For hdnode2:
$ sudo vim /usr/local/hadoop/etc/hadoop/mapred-site.xml
Repead the same as like hdnode1.
16. Slaves File.
Let us create workers file, only for hnnode and write the following lines as show in figure.
        hdnode1
        hdnode2
hduser@hnnode$ sudo vim /usr/local/hadoop/etc/hadoop/workers

If you see any entry related to localhost, feel free to delete it. This is just helper file that are used by hadoop scripts to start appropriate services on name node and data nodes.

17. Creating Folders:
17.1. Create Namenode folder(hnnode only)
hduser@hnnode$
        $ sudo mkdir -p /usr/local/hadoop/data/namenode
        sudo chown hduser:hadoop -R /usr/local/hadoop/
        sudo chmod 777 /usr/local/hadoop/data/namenode

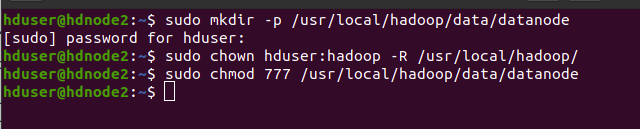
17.2. Create Datanode folder(hdnode1 Only)
hduser@hdnode1$
        sudo mkdir -p /usr/local/hadoop/data/datanode
        sudo chown hduser:hadoop -R /usr/local/hadoop/
        sudo chmod 777 /usr/local/hadoop/data/datanode

17.3. Create Datanode folder(hdnode2 Only)
hduser@hdnode2$
        sudo mkdir -p /usr/local/hadoop/data/datanode
        sudo chown hduser:hadoop -R /usr/local/hadoop/
        sudo chmod 777 /usr/local/hadoop/data/datanode
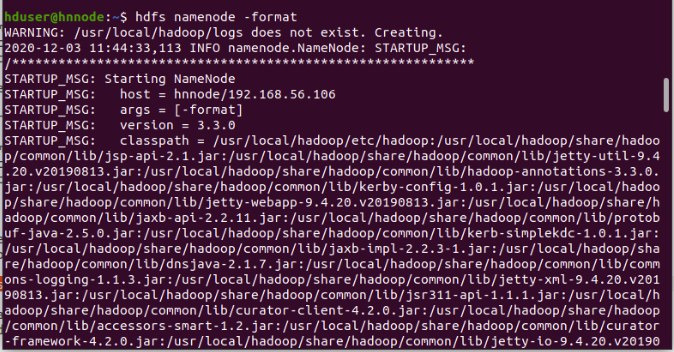
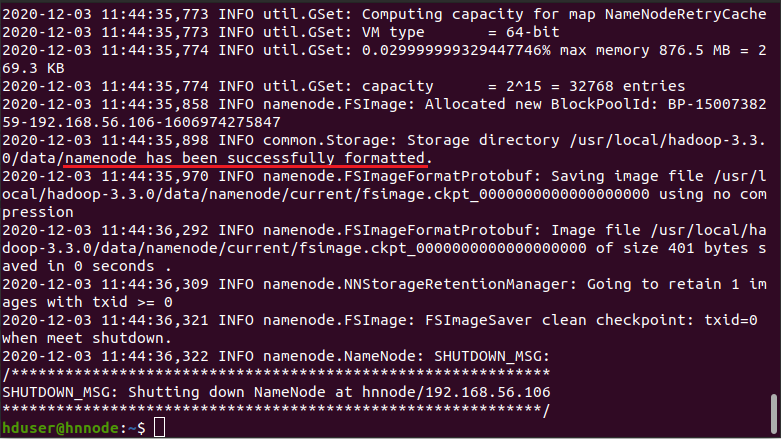
18. Format the Namenode(hnnode only)
Before starting the cluster, we need to format the Name node. Use the following command only on hnnode as shown in the figure. Output of format command is very large for this upper and lower portions of it is given in two screenshots and red under line shows the namenode has been successfully formatted.
$ hdfs namenode -format
19. Hadoop Startup
(hnnode only)
To start a Hadoop cluster we need to start both the HDFS and YARN cluster.
        $ start-dfs.sh
        $ start-yarn.sh
        or
        $ start-dfs.sh && start-yarn.sh             #starting both at once

        hduser@hnnode$ jps

        5412 Namenode                               #because of start-dfs.sh
        5664 SecondaryNamenode                      #because of start-dfs.sh
        5948 ResourceManager                        #because of start-yarn.sh
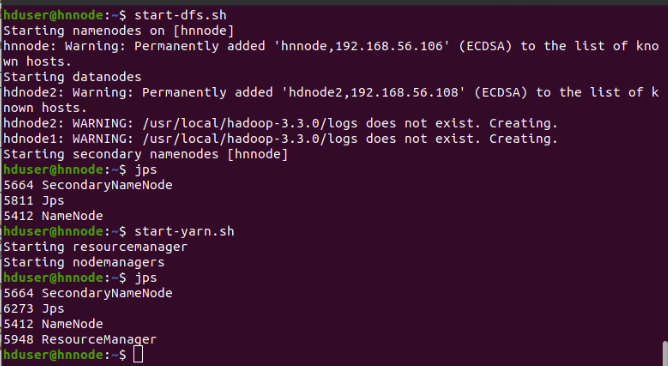
jps on datanodes ( hdnode1 and hdnode2)
        hduser@hdnode1$ jps

        4974 DataNode                           #because of start-dfs.sh
        5138 NodeManager                        #because of start-yarn.sh

20. Web Interfaces:
If the Hadoop cluster is up and running successfully, then you can check the web-ui of the components as described bellow:
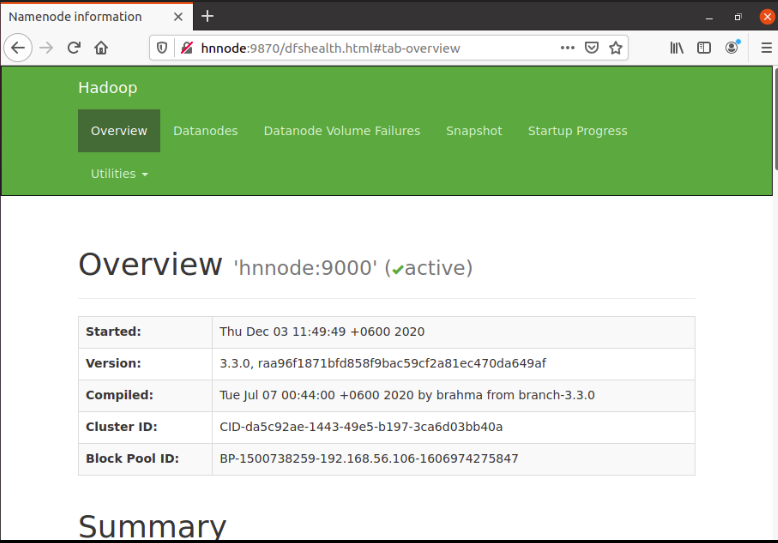
20.1. Daemon : Namenode
Web Interface: http://hnnode:9870
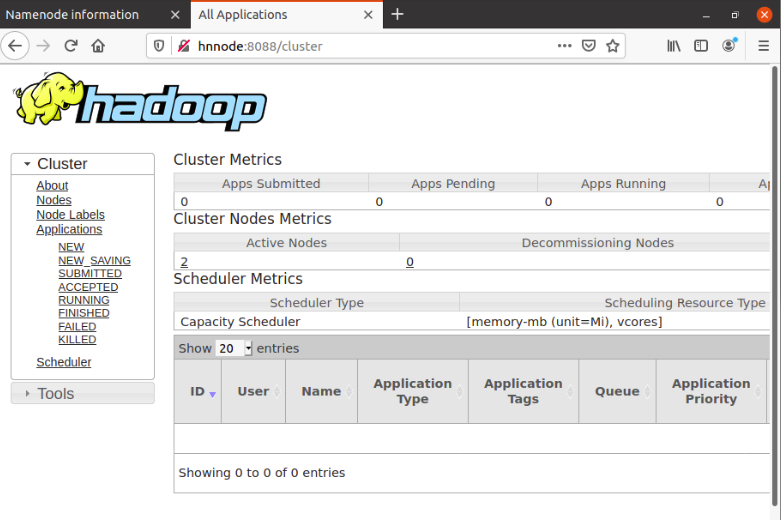
20.2. Daemon: ResourceManager
Web Interface : http://hnnode:8088
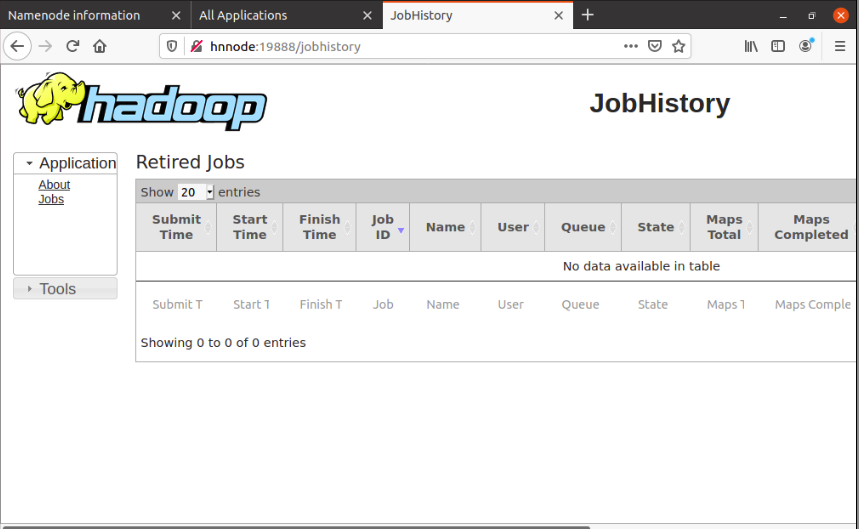
20.3. Daemon: MapReduce JobHistory Server
Web Interface: http://hnnode:19888
JobHistory Server process has to be started separately.
21. References
• Apache Software Foundation
Hadoop Cluster Setup
• Hadoop in Practice(Second Edition) by Alex Holmes.
• OnlineLearningCerter by Mr Suraz.
Hadoop Learning Center
Hadoop 3.2.0 Multi Node Configuration
• And Others Hadoop Cluster setups in internet.

Image:freepik